There is a rather obscure system setting that gets overlooked in a vast majority of CRM implementations, it relates to sharing records with the original owner.
In the Settings --> Administration --> System Settings window, right on the General Tab. There is a section marked as "Set whether reassigned records are shared with the original owner". You can then choose whether or not to share reassigned records with the original owner.
What this does is any time you reassign a record it will share the record with the previous owner. Not just the original creator, but every owner after. So, this could be a great way for people outside of the sales department to follow up on leads that they have passed onto the sales team. See how deals they provided the company have panned out. Or cases created by the sales team can be viewed again to see how the customer support team handled a situation that a sales rep reported.
On the other hand, this could be a potential security nightmare for some companies where users should only see their own records. So, any time a sales person switches territories, or customer service reps who should only be servicing specific customers could potentially see more than is intended.
The good news is that fixing this is as simple as changing this option in the System Settings from "Yes" to "No". This will not undo anything that is already shared, but it will stop the system from sharing anything more if you don't want it to.
Knowing how data can be viewed helps when there is a "security breach" and suddenly people can see more than they are supposed to see.
David Fronk
Dynamic Methods Inc.
Friday, May 15, 2009


Friday, May 08, 2009
Sharing Records Automatically
From the number of implementations that I've done I believe sharing to be greatly underutilized. Part of the reason is that it is rather clicky in order to set up someone with the rights to see a record. It's hidden in the "More Actions" menu and then you can share with a user or a team. Teams help to facilitate mass sharing but still, most users and typical CRM administrators don't even know that teams exist.
Most implementations just open things up at the business unit level, or even the global level (depending on the size of the company) and don't even worry about sharing. However, there are times when certain information can be sensitive and necessary to restrict access to. Typically these things can be activities, opportunities, cases, services billed, hours worked, etc.
For instance, suppose sales reps aren't allowed to see support cases but are allowed to see the accounts that they manage. Any good account manager would want to know what support issues their account has been having before engaging on a new business proposal, so obviously the sales rep should get to see the cases related to the account.
All that is required is a couple of plugins at two main points and upon creation of a case and reassignment of an account. Whenever a case is created, get the account manager of the account on the case and share the case with that user. If the account gets reassigned, remove the share from the old account manager and add rights to the new account manager. Now with simple logic you can make data more accessible to those who should see the data without them having to do anything more than their regular job.
One side note, be aware that the more items there are under a parent record the longer the reassignments of records will take. For instance, if I reassign an account with 50 cases that's going to take a lot longer to complete the reassignment than it would if there were 5 cases, or even none. Just keep that in mind as you develop your sharing solution.
Pretty simple, and the SDK has some great examples on how to do this. Look up "AccessRights Enumeration", "GrantAccess Message", and "RevokeAccess Message" in the SDK and you should have everything you need.
Here's a quick example on how to share and give all rights to a user:
SecurityPrincipal principal = new
SecurityPrincipal();
principal.Type = SecurityPrincipalType.User;
principal.PrincipalId = new
Guid("7B222F98-F48A-4AED-9D09-77A19CB6EE82");
PrincipalAccess access = new
PrincipalAccess();
access.Principal = principal;
access.AccessMask = AccessRights.ReadAccess;
TargetOwnedDynamic target = new
TargetOwnedDynamic();
target.EntityId = new
Guid("6A92D3AE-A9C9-4E44-9FA6-F3D5643753C1");
target.EntityName = "incident";
GrantAccessRequest readGrant = new
GrantAccessRequest();
readGrant.PrincipalAccess = access;
readGrant.Target = target;
GrantAccessResponse readGranted = (GrantAccessResponse)crmService.Execute(readGrant);
access.AccessMask = AccessRights.WriteAccess;
readGrant.PrincipalAccess = access;
GrantAccessResponse writeGranted = (GrantAccessResponse)crmService.Execute(readGrant);
access.AccessMask = AccessRights.AppendAccess;
readGrant.PrincipalAccess = access;
GrantAccessResponse appendGranted = (GrantAccessResponse)crmService.Execute(readGrant);
access.AccessMask = AccessRights.AppendToAccess;
readGrant.PrincipalAccess = access;
GrantAccessResponse appendToGranted = (GrantAccessResponse)crmService.Execute(readGrant);
access.AccessMask = AccessRights.AssignAccess;
readGrant.PrincipalAccess = access;
GrantAccessResponse assignGranted = (GrantAccessResponse)crmService.Execute(readGrant);
access.AccessMask = AccessRights.DeleteAccess;
readGrant.PrincipalAccess = access;
GrantAccessResponse deleteGranted = (GrantAccessResponse)crmService.Execute(readGrant);
And here is an example on how to revoke access:
SecurityPrincipal principal = new
SecurityPrincipal();
principal.Type = SecurityPrincipalType.User;
principal.PrincipalId = new
Guid("7B222F98-F48A-4AED-9D09-77A19CB6EE82");
PrincipalAccess access = new
PrincipalAccess();
access.Principal = principal;
access.AccessMask = AccessRights.ReadAccess;
TargetOwnedDynamic target = new
TargetOwnedDynamic();
target.EntityId = new
Guid("6A92D3AE-A9C9-4E44-9FA6-F3D5643753C1");
target.EntityName = "incident";
GrantAccessRequest readGrant = new
GrantAccessRequest();
readGrant.PrincipalAccess = access;
readGrant.Target = target;
GrantAccessResponse readGranted = (GrantAccessResponse)crmService.Execute(readGrant);
Happy sharing!
David Fronk
Dynamic Methods Inc.
Friday, May 01, 2009
Open new Modal Window from onLoad
There are times where administrators and/or executives/managers want to alert users opening a given record about something important on a given record. If people need to be warned that they shouldn't call the contact because they are marked as "Do Not Call" or an Account is marked as being "On Hold". Those can typically be done through alerts. But if logic is needed off of related objects, such as only allowing 3 items per Order, or if a number of Cases have been opened within a given period of time, that's not as easy to do with JScript.
That means that you would need to take your logic to a webpage on the load of the given entity. But since you are opening another web page (through the window.open method) users would be able to click around it and ignore it, making the work of the web page useless.
If you use the window.showModalDialog method then you can change all that. A Modal Dialog requires users to take action on the newly opened window before they can get to the record they are trying to open. The method is very similar to the window.open method, allowing you to control the size of the page, what bars show (status, menu, etc) on the web page. Here's the code:
if(crmForm.ObjectId != null)
{
var url = "/ISV/Test/OrderDetailCheck.aspx?id=" + crmForm.ObjectId;
//window.open(url);
window.showModalDialog(url, "Order Detail Check","dialogWidth:200px;dialogHeight:150px;center:yes;status:no");
}
Just put this in the OnLoad of your entity and you now have a custom page that you can fully customize, modify and design that users must look at take action on before they can access a record.
David Fronk
Dynamic Methods Inc.
That means that you would need to take your logic to a webpage on the load of the given entity. But since you are opening another web page (through the window.open method) users would be able to click around it and ignore it, making the work of the web page useless.
If you use the window.showModalDialog method then you can change all that. A Modal Dialog requires users to take action on the newly opened window before they can get to the record they are trying to open. The method is very similar to the window.open method, allowing you to control the size of the page, what bars show (status, menu, etc) on the web page. Here's the code:
if(crmForm.ObjectId != null)
{
var url = "/ISV/Test/OrderDetailCheck.aspx?id=" + crmForm.ObjectId;
//window.open(url);
window.showModalDialog(url, "Order Detail Check","dialogWidth:200px;dialogHeight:150px;center:yes;status:no");
}
Just put this in the OnLoad of your entity and you now have a custom page that you can fully customize, modify and design that users must look at take action on before they can access a record.
David Fronk
Dynamic Methods Inc.
Friday, April 24, 2009
Shared Variable in JScript
An occasion came up where the value of a field needed to be masked but still allow the correct value to be saved to the database. Envision sensitive information like social security numbers, credit card numbers, etc. These are things that data entry people need to enter but not necessarily see the entire number after they enter it.
You could use another field to house the real information and hide that field on the form so no one can see it, but then you run the risk of having that information in another place unnecessarily. Also, if someone is going to this length to make sure users can't see this information they probably want to make sure that the data gets encrypted in the database so that users couldn't get the information from the grid any way.
So, to keep this more hidden and more secure you actually can use a variable between your methods on the same document. It's actually really easy, here's how:
In the OnLoad of the form write:
document.newvariable = 5;
Now in your OnChange or OnSave you can reference that variable the same way.
crmForm.all.new_securefield.DataValue = document.newvariable;
So, if you wanted to mask something:
In the OnLoad:
document.originalvalue = crmForm.all.new_securefield.DataValue;
crmForm.all.new_securefield.DataValue = "xxxxxxxx" + crmForm.all.new_securefield.DataValue.SubString(8, crmForm.all.new_securefield.DataValue.Length - 8);
And now in the OnSave:
//Hide the field so the real value doesn't appear just before the save
crmForm.all.new_securefield.style.visibility = 'hidden';
crmForm.all.new_securefield.DataValue = document.newvariable;
Simple but effective for keeping data secure on the form. I'm sure there are many more uses for global variables like this, this is just one way that it can be implemented.
David Fronk
Dynamic Methods Inc.
You could use another field to house the real information and hide that field on the form so no one can see it, but then you run the risk of having that information in another place unnecessarily. Also, if someone is going to this length to make sure users can't see this information they probably want to make sure that the data gets encrypted in the database so that users couldn't get the information from the grid any way.
So, to keep this more hidden and more secure you actually can use a variable between your methods on the same document. It's actually really easy, here's how:
In the OnLoad of the form write:
document.newvariable = 5;
Now in your OnChange or OnSave you can reference that variable the same way.
crmForm.all.new_securefield.DataValue = document.newvariable;
So, if you wanted to mask something:
In the OnLoad:
document.originalvalue = crmForm.all.new_securefield.DataValue;
crmForm.all.new_securefield.DataValue = "xxxxxxxx" + crmForm.all.new_securefield.DataValue.SubString(8, crmForm.all.new_securefield.DataValue.Length - 8);
And now in the OnSave:
//Hide the field so the real value doesn't appear just before the save
crmForm.all.new_securefield.style.visibility = 'hidden';
crmForm.all.new_securefield.DataValue = document.newvariable;
Simple but effective for keeping data secure on the form. I'm sure there are many more uses for global variables like this, this is just one way that it can be implemented.
David Fronk
Dynamic Methods Inc.
Thursday, April 16, 2009
Microsoft CRM Developer Toolkit
I'm probably late in getting this up but the MSCRM Developer Toolkit is now available at the following link:
http://code.msdn.microsoft.com/E2DevTkt
Be aware that you must be running Visual Studio 2008 and CRM 4.0 in order for this to work. Here are the highlights of what the toolkit offers from within Visual Studio:
1. View All CRM Entities - Displays a listing of CRM entities that are dynamically available from the CRM Explorer within Visual Studio 2008
2. Create and Update CRM Entities - Allows for creating new entities and updating existing entities from within the CRM Explorer experience
3. Create a Wrapper Class - Provides the ability to auto-generate wrapper classes for entities, which exposes the CRM entities and their corresponding attributes as classes and properties respectively to enable development of code to interact with the entities
4. Generate Plug-in Code - Enumerates the available Plug-ins for an entity and generates the code necessary to jumpstart the plug-in development process
5. Integrate the Build and Deploy Process - Simplifies the process of building and deploying a CRM solution
6. Deploy Across Multiple Servers - Assists in deployment and maintenance of Windows installer packages across multiple environments
Please be aware that in their documentation they actually do come out and say that this tool is UNSUPPORTED and is provided, AS IS. Not exactly sure why they would include that since this is put out by Microsoft but there you go. Use at your own risk.
David Fronk
Dynamic Methods Inc.
http://code.msdn.microsoft.com/E2DevTkt
Be aware that you must be running Visual Studio 2008 and CRM 4.0 in order for this to work. Here are the highlights of what the toolkit offers from within Visual Studio:
1. View All CRM Entities - Displays a listing of CRM entities that are dynamically available from the CRM Explorer within Visual Studio 2008
2. Create and Update CRM Entities - Allows for creating new entities and updating existing entities from within the CRM Explorer experience
3. Create a Wrapper Class - Provides the ability to auto-generate wrapper classes for entities, which exposes the CRM entities and their corresponding attributes as classes and properties respectively to enable development of code to interact with the entities
4. Generate Plug-in Code - Enumerates the available Plug-ins for an entity and generates the code necessary to jumpstart the plug-in development process
5. Integrate the Build and Deploy Process - Simplifies the process of building and deploying a CRM solution
6. Deploy Across Multiple Servers - Assists in deployment and maintenance of Windows installer packages across multiple environments
Please be aware that in their documentation they actually do come out and say that this tool is UNSUPPORTED and is provided, AS IS. Not exactly sure why they would include that since this is put out by Microsoft but there you go. Use at your own risk.
David Fronk
Dynamic Methods Inc.
Monday, April 13, 2009
Changing Default SQL Port
In order to keep data more secure requests have come in to have SQL run on a different port. This helps to avoid typical SQL port scans and keep your database off of the "easy to target" list. Changing the database and having CRM work after the change is actually pretty simple.
Please note that this configuration change requires modifying of the registry and updating the MSCRM_Config database. Both of these actions are NOT SUPPORTED by MS Support. So, perform at your own risk.
Here's how it works:
1.Open SQL Server Configuration Manager

2. Choose your instance of SQL that you want to change the port on and open the "TCP/IP" Property.

3. A new window will open.
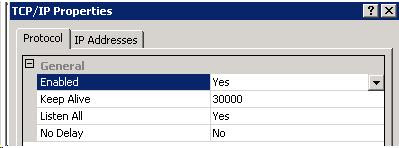
4. Click on the "IP Addresses" tab and scroll to the bottom. Under the "IPAll" section change the "TCP Port" to the port desired. Click Ok.

You will be told that the changes will not take effect until SQL services have been restarted. Restart the Services and you are all set for this step.
Next you will need to change three keys in the MSCRM hive of the registry on the CRM server:
1. configdb
2. database
3. metabase
Each of these keys will have a "Data Source" switch that has the name of the SQL server as the Data Source. In order to tell the connection to use the specified port you will need to add a comma "," and then the port. For example:
Provider=SQLOLEDB;Data Source=SQLSERVER,1234;Initial Catalog=CompanyName_MSCRM;Integrated Security=SSPI
Lastly, you will need to update the Organization table of the MSCRM_Config DB. Just like you updated the registry keys previously, the same thing will need to be done to the "ConnectionString" column of the Organization table. Run the following SQL scripts:
SELECT ConnectionString, Id from Organization
This will give you the current connection string being used. Copy and paste the value into your query page. Add the comma "," to the Data Source and then update the table.
UPDATE Organization
SET ConnectionString = 'Provider=SQLOLEDB;Data Source=SQLSERVER,1234;Initial Catalog=CompanyName_MSCRM;Integrated Security=SSPI'
where Id = '(put in the Organization Id from your select that you ran previously)'
And now, as long as your Window's Firewall is set up to allow traffic over the newly chosen port, you're all set. Watch out for those firewall rules as they can make a perfectly implemented configuration change all for not.
Enjoy your newly secured solution!
David Fronk
Dynamic Methods Inc.
Friday, April 03, 2009
Case Sensitive Searches in CRM
There have been a few instances that have come up where customers have requested the ability to make a certain field case sensitive. Typically this is for key fields, like foreign keys. But since the MSCRM database table collation is typically not set up for case sensitivity you don't get the option.
You can however set the collation at the column level and make just the field you want case sensitive.
Here are the steps:
1. Open Microsoft SQL Server Management Studio
2. Expand the <OrganizationName>_MSCRM
3. Pick the table you want (for example dbo.AccountBase) and expand the table
4. Expand the Columns folder
5. Right click on the column you want to set as being case sensitive
6. Choose Modify
7. In the right window panes make sure the field you want to change is highlighted
8. In the bottom pane of the right window (Column Properties) find the "Collation" property and click on the elipses in the right hand column to edit the property.
9. A new window will come up and you will see a checkbox for "Case Sensitive", check that box.
10. Click OK
11. Restart the SQL services
12. Just to be safe restart IIS
Now you're all set with a new case sensitive field.
Also, just to add the disclaimer. THIS IS NOT SUPPORTED by MS Support, so apply at your own risk. You have been warned. I have yet to see any issue arise from this, but my job is to make you aware.
David Fronk
Dynamic Methods Inc.
You can however set the collation at the column level and make just the field you want case sensitive.
Here are the steps:
1. Open Microsoft SQL Server Management Studio
2. Expand the <OrganizationName>_MSCRM
3. Pick the table you want (for example dbo.AccountBase) and expand the table
4. Expand the Columns folder
5. Right click on the column you want to set as being case sensitive
6. Choose Modify
7. In the right window panes make sure the field you want to change is highlighted
8. In the bottom pane of the right window (Column Properties) find the "Collation" property and click on the elipses in the right hand column to edit the property.
9. A new window will come up and you will see a checkbox for "Case Sensitive", check that box.
10. Click OK
11. Restart the SQL services
12. Just to be safe restart IIS
Now you're all set with a new case sensitive field.
Also, just to add the disclaimer. THIS IS NOT SUPPORTED by MS Support, so apply at your own risk. You have been warned. I have yet to see any issue arise from this, but my job is to make you aware.
David Fronk
Dynamic Methods Inc.
Subscribe to:
Posts (Atom)
