Tuesday, June 26, 2007

Changing the Port Number of your CRM Website

One might think that changing the port number which CRM uses is pretty straight forward but I found that it wasn't quite as simple as I thought. I ran into this in order to get CRM and SharePoint to play nice together on a server which already had CRM installed and I needed to install SharePoint on the same server.

The first thing that I did was go into the IIS Management Console and manually change the port number there. I found out that was only half the problem. From here, once this change is made one could run a repair and that should make all of the necessary changes to the CRM web site for you from there. However, if you have installed Rollup1, or any other patches for that matter, you would then have to reinstall everyone of those patches. Not the most effective use of time in my opinion.

So, after poking around a bit I found that the other piece that I needed to update was the URL registry key titled "ServerURL" under the "HKey_LOCAL_MACHINE\SOFTWARE\Microsoft\MSCRM" hive. You simply need only to add the colon ":" and the port number and you're set. So, your URL would go from "http:///MSCRMServices" to "http:///MSCRMServices:5555" and you're set. Quick, efficient and it works.

David Fronk
Dynamic Methods Inc.

Friday, February 09, 2007

MSCRM Integration with Docupace

I am finding that "integration" is the one of the latest business buzz words. User's don't want to have 8 to 10 applications open throughout the day to get their work done. So, requests of getting to other applications from Microsoft CRM has become a normal request for most of my clients. Some integrations can be very complex (where data gets passed between systems) and others can be rather simple (click a button for a view into the desired application).

My most recent request has been to integrate MSCRM with Docupace. For those of you who haven't seen or heard of Docupace, Docupace is a service provider of 'on demand' business process automation solutions for small to mid-sized businesses, departments, branches of large enterprises and outsourcers - across all industries. With a wide range of imaging and document management solutions, Docupace delivers rich, enterprise-class functionality that is easy to deploy, use and manage. (http://www.docupace.com/overview.html)

This happens to be one of the simpler integrations because no data is traded between the two systems. Just a search through Docupace with CRM provided data.

With a simple click of a button:


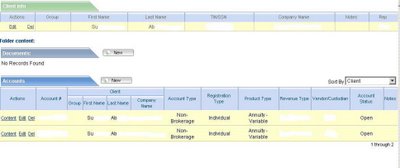
The user logs into Docupace and a Docupace window opens that goes directly to the client's page.


This allows users to jump straight into Docupace and get to specific client documents. Also, if Docupace credentials get passed from CRM to Docupace, users can be limited in what documents they can see within Docupace, through CRM privileges. If a user can only see his/her contacts he/she will only be able to launch Docupace windows from his/her contacts.

Great functionality, usability and ease of integration between the two systems make this a great addition for client's tools to use in the market.


Happy Coding!

David Fronk
Dynamic Methods Inc.

Friday, December 08, 2006

Toolbar Buttons on the Grid/List View

This customization has been one I've been trying to figure out for some time. After checking some different posts on different MSCRM groups I finally pieced together everything I needed to be able to grab the GUID of the selected record(s) from the list.

The best thing about this customization is that it's totally supported and you will only have to change your code if Microsoft changes their code in one of their .js files.

So, let's get into actually applying this customization. First things first, let's get into the isv.config file. Within the Entity tag you want to get into the Grid tag. The isv.config file I was working with did not have this tag and I came across how to add a button in the SDK. So, the XML structure should look like this:

<Entity>
<MenuBar>
<Additional Tags Here></Additional Tags Here>
</MenuBar>
<ToolBar>
<Additional Tags Here></Additional Tags Here>
</ToolBar>
<NavBar>
<Additional Tags Here></Additional Tags Here>
</NavBar>
<Grid>
<MenuBar>
</MenuBar>
<Buttons>
<Button Title=""...etc/>
</Buttons>
</Grid>
</Entity>

Add the button just like you would anywhere else in CRM. Please refer to the SDK for additional switches that can be added to the Button tag.

So, that's adding the button. One other note about adding a button here to the Grid is that is shows up in all Grid views for the entity. This includes, the main CRM page, Advance Find, and Associated Views. So, your button shows up everywhere.

Now that we've got a button, we can make it go to a custom ASPX page and basically do whatever we want. The hardest part of this passing the GUID of the item(s) you have selected in order to take action against them. Now, to figure this out I took numerous suggestions off of different posts but the one that really "sealed the deal" for me was from Gunady. I'm not sure if he got his information from someone else or not but I have to give credit where credit is due and he gave me the bit I needed to get my customization to work.

The key is this little bit of JavaScript: getSelected('crmGrid'). This gives you the GUID of whatever items you have selected in the CRM Grid. So, if you have one selected this code will pass the GUID with the curly braces "{}" around it. If multiple items are selected then each GUID will be separated by a comma ",".

So, my button code looks like this:

<Button Title="ButtonTest" PassParams="1" ToolTip="Test" WinMode="0" JavaScript="window.open('http://crm/GridButton/GridButton.aspx?oid='+ getSelected('crmGrid'), 'test','top=100,left=175,width=500,height=300,menubar=no,
resizable=yes');" />

Once I had that all I had to do was pull the parameter in my custom ASPX page code and then do whatever I wanted with it. To pull the parameter I used this line of code in the Page_Load method of my Visual Studio project:

objoid = Request.Params["oid"];

Next thing I had to do was separate the GUIDs from each other in the case of a multiselection. I used the Split method from the String class to do that using the comma "," and through my values into an array. Once I had the array built I then just cycle through a while loop (checking against the length of the array), strip the curly braces "{}" from my GUID (because the GUID method just wants the numbers) and then use each GUID in the array to do whatever customization I want.

I know I spent quite a bit of time researching this so I hope my findings are able to help someone else out in their CRM customizations.

Happy Coding!

David Fronk
Dynamic Methods Inc.

Thursday, October 19, 2006

Renaming a NavBar Item within a form through JScript

Ok, so it's be a ridiculously long time since I've posted. MSCRM 3.0 has kept us at Dynamic Methods REALLY busy. One of the good things about that is that we figure out new ways to customize MSCRM. This latest comes from one of my co-workers who took hiding a button through JScript and applied it to changing the name of a NavBar item.

On an order a client didn't want "Existing Products" to be named "Existing Products" and asked if we could rename it to say "Line Items." Well, after playing with the code for hiding a button in the toolbar this is what came out:


The code for this piece is technically not supported but obviously since it's placed in the onLoad of the form the worst thing that will happen is that the code changes in the next version and you have to update your code to what the new version uses. So, pretty low risk with great results for the user base. And whenever you make the users happy it's a big for getting them to use the system.

Anyway, this is the code that we used:

var navWriteInProducts;var navContacts;
var navExistingProducts;navWriteInProducts = document.all.navWriteInProducts;
navContacts = document.all.navContacts;
navExistingProducts = document.all.navExistingProducts;
if (navWriteInProducts != null){
navWriteInProducts.style.display = "none";
}
if (navContacts != null){
navContacts.style.display = "none";
}
if (navExistingProducts != null){
document.getElementById("navExistingProducts").innerHTML = "<img class="\" src="\" align="\" /> <nobr class="\" title="\" style="\">Line Items</nobr>"<nobr class="\" title="\">;
}

The key is this last piece where we replace the innerHTML. It basically replaces the default HTML and injects whatever we want to show up there. Pretty cool. Again, this code isn't new by any means, I've seen it in posts all over the MSCRM world, all we did is find a new application for the code.

Happy Coding!

David Fronk
Dynamic Methods Inc.

Friday, June 02, 2006

Changing/Hiding Form Labels

I've noticed a lot of posts in message groups about hiding or changing the label on a given field on a form. And there have been some really great scripts found to hide or even change the name of the field on the form. For those of you who haven't seen how to do it the script code is this:

crmForm.all._c

The "_c" is the key to allowing you to then go on and use .innerText to change the Label value, or .style.visible for hiding the label.

These scripts work well but the problem with them is that they are not supported and in the next upgrade we may have to go back and change all of our code.

There is an even easier way to hide a label or change its name than through script and its supported. I wish I could say the same for hiding a field but I have yet to find one.

So, what is this supported way? Well, its something so simple I'm sure everyone who's customized CRM has seen it but, like me, they don't pay any attention to it any more and forget that its there.

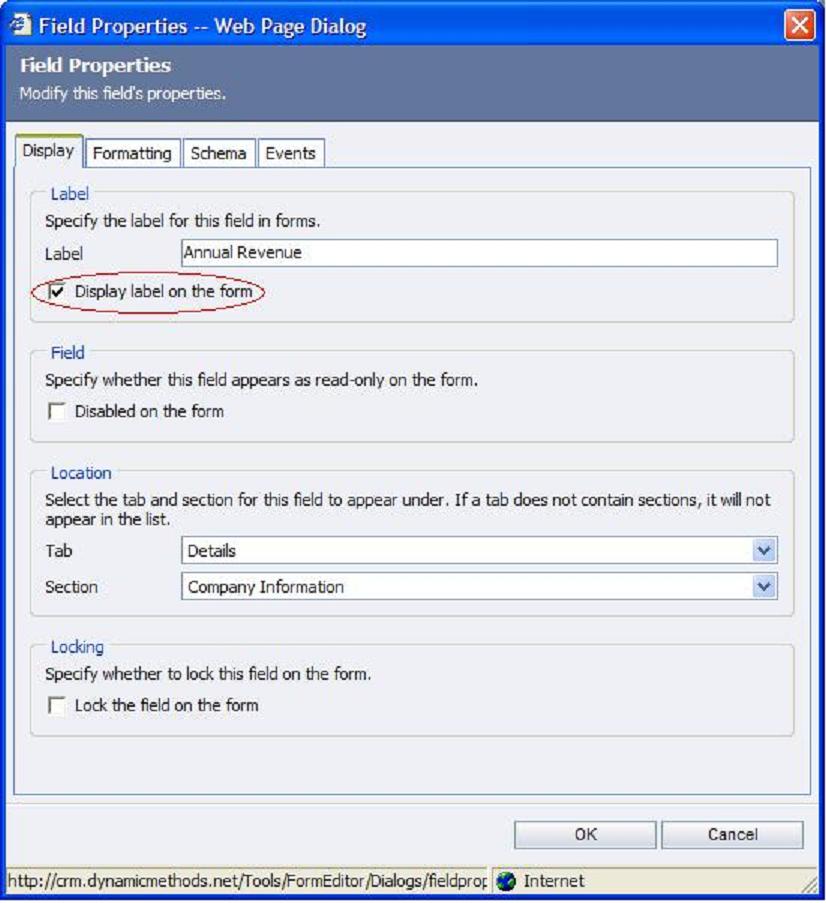
If you go to the Customization portion within Settings, open up the Form and double click on the field whose label you want to change or hide. The first text box is the name of the label. Just type in there to change what gets displayed on the form as the label of that particular field. Please note that this will NOT change the field's name in Advance Find, you would need to go to the Attributes section and change the Display Name of the attribute for that.

Now, the thing that I figure most people overlook (like I did) is the checkbox labeled "Display label on the form." If you uncheck that checkbox the label on the form will disappear and the textbox on the form will fill in the space of the label.


The only downside to using this approach is that it is a static setting. No dynamic renaming or hiding of the field. But this does the same thing as the scripts, only its supported and actually easier than going out and having to figure out the code to hack the CRM forms.

Fronk

Wednesday, April 05, 2006

Simplifying use of client script usage on a form

For those of you who read through the entire SDK this may not be news to you but in my latest perusal of the SDK I found a really cool function that I hadn't seen before.

It is the "FireOnChange()". Basically its used to fire the onChange of another field. Why would you ever use this? Well, if anyone asks you to have autocalculating fields you have to do the calculations for each field separately, or code for every case and then copy and paste it into every field on the form that is related to the calculation. Not too bad. But if you then realize that you programmed something incorrectly, or something needs to be changed, you have to go back and make the change to every field with the code in it.

Using the "FireOnChange()" command helps you manage your code SOOOO much better. Basically, you write your code in one field and have it handle every case for all of the other fields. Then you just have all the other fields reference the field with the code. When you update or change the code you only have to do it once because all of the other fields are looking to one place for your code.

Usage:
crmForm.all.fieldname.FireOnChange();

That's it! Really simple but very helpful.

David Fronk
Dynamic Methods Inc.

Monday, April 03, 2006

Quick way to turn on Server side tracing

I forgot to post this with the Client side tracing, better late than never I guess.

Again, make sure there is a folder created on your C drive called "tracing" and then just copy and paste the text into a text file then change the name from .txt to .reg, double click and you're set!

StartServerTrace
Windows Registry Editor Version 5.00
[HKEY_LOCAL_MACHINE\Software\Microsoft\MSCRM]"
TraceEnabled"=dword:00000001
"TraceDirectory"="c:\\Tracing"
"TraceCategories"="*:Verbose"
"TraceCallStack"=dword:00000001
"TraceRefresh"=dword:00000001
"TraceSchedule"="Hourly"
"OleDBTimeOut"=dword:00008000

StopServerTrace
Windows Registry Editor Version 5.00
[HKEY_LOCAL_MACHINE\Software\Microsoft\MSCRM]
"TraceEnabled"=dword:00000000
"TraceDirectory"="c:\\Tracing"
"TraceCategories"="*:Verbose"
"TraceCallStack"=dword:00000001
"TraceRefresh"=dword:00000002
"TraceSchedule"="Hourly"
"OleDBTimeOut"=dword:00008000

Enjoy!

David Fronk
Dynamic Methods Inc.