This customization has been one I've been trying to figure out for some time. After checking some different posts on different MSCRM groups I finally pieced together everything I needed to be able to grab the GUID of the selected record(s) from the list.
The best thing about this customization is that it's totally supported and you will only have to change your code if Microsoft changes their code in one of their .js files.
So, let's get into actually applying this customization. First things first, let's get into the isv.config file. Within the Entity tag you want to get into the Grid tag. The isv.config file I was working with did not have this tag and I came across how to add a button in the SDK. So, the XML structure should look like this:
<Entity>
<MenuBar>
<Additional Tags Here></Additional Tags Here>
</MenuBar>
<ToolBar>
<Additional Tags Here></Additional Tags Here>
</ToolBar>
<NavBar>
<Additional Tags Here></Additional Tags Here>
</NavBar>
<Grid>
<MenuBar>
</MenuBar>
<Buttons>
<Button Title=""...etc/>
</Buttons>
</Grid>
</Entity>
Add the button just like you would anywhere else in CRM. Please refer to the SDK for additional switches that can be added to the Button tag.
So, that's adding the button. One other note about adding a button here to the Grid is that is shows up in all Grid views for the entity. This includes, the main CRM page, Advance Find, and Associated Views. So, your button shows up everywhere.
Now that we've got a button, we can make it go to a custom ASPX page and basically do whatever we want. The hardest part of this passing the GUID of the item(s) you have selected in order to take action against them. Now, to figure this out I took numerous suggestions off of different posts but the one that really "sealed the deal" for me was from Gunady. I'm not sure if he got his information from someone else or not but I have to give credit where credit is due and he gave me the bit I needed to get my customization to work.
The key is this little bit of JavaScript: getSelected('crmGrid'). This gives you the GUID of whatever items you have selected in the CRM Grid. So, if you have one selected this code will pass the GUID with the curly braces "{}" around it. If multiple items are selected then each GUID will be separated by a comma ",".
So, my button code looks like this:
<Button Title="ButtonTest" PassParams="1" ToolTip="Test" WinMode="0" JavaScript="window.open('http://crm/GridButton/GridButton.aspx?oid='+ getSelected('crmGrid'), 'test','top=100,left=175,width=500,height=300,menubar=no,
resizable=yes');" />
Once I had that all I had to do was pull the parameter in my custom ASPX page code and then do whatever I wanted with it. To pull the parameter I used this line of code in the Page_Load method of my Visual Studio project:
objoid = Request.Params["oid"];
Next thing I had to do was separate the GUIDs from each other in the case of a multiselection. I used the Split method from the String class to do that using the comma "," and through my values into an array. Once I had the array built I then just cycle through a while loop (checking against the length of the array), strip the curly braces "{}" from my GUID (because the GUID method just wants the numbers) and then use each GUID in the array to do whatever customization I want.
I know I spent quite a bit of time researching this so I hope my findings are able to help someone else out in their CRM customizations.
Happy Coding!
David Fronk
Dynamic Methods Inc.
Friday, December 08, 2006
Thursday, October 19, 2006
Renaming a NavBar Item within a form through JScript
Ok, so it's be a ridiculously long time since I've posted. MSCRM 3.0 has kept us at Dynamic Methods REALLY busy. One of the good things about that is that we figure out new ways to customize MSCRM. This latest comes from one of my co-workers who took hiding a button through JScript and applied it to changing the name of a NavBar item.
On an order a client didn't want "Existing Products" to be named "Existing Products" and asked if we could rename it to say "Line Items." Well, after playing with the code for hiding a button in the toolbar this is what came out:

The code for this piece is technically not supported but obviously since it's placed in the onLoad of the form the worst thing that will happen is that the code changes in the next version and you have to update your code to what the new version uses. So, pretty low risk with great results for the user base. And whenever you make the users happy it's a big for getting them to use the system.
Anyway, this is the code that we used:
var navWriteInProducts;var navContacts;
var navExistingProducts;navWriteInProducts = document.all.navWriteInProducts;
navContacts = document.all.navContacts;
navExistingProducts = document.all.navExistingProducts;
if (navWriteInProducts != null){
navWriteInProducts.style.display = "none";
}
if (navContacts != null){
navContacts.style.display = "none";
}
if (navExistingProducts != null){
document.getElementById("navExistingProducts").innerHTML = "<img class="\" src="\" align="\" /> <nobr class="\" title="\" style="\">Line Items</nobr>"<nobr class="\" title="\">;
}
The key is this last piece where we replace the innerHTML. It basically replaces the default HTML and injects whatever we want to show up there. Pretty cool. Again, this code isn't new by any means, I've seen it in posts all over the MSCRM world, all we did is find a new application for the code.
Happy Coding!
David Fronk
Dynamic Methods Inc.
Friday, June 02, 2006
Changing/Hiding Form Labels
I've noticed a lot of posts in message groups about hiding or changing the label on a given field on a form. And there have been some really great scripts found to hide or even change the name of the field on the form. For those of you who haven't seen how to do it the script code is this:
crmForm.all._c
The "_c" is the key to allowing you to then go on and use .innerText to change the Label value, or .style.visible for hiding the label.
These scripts work well but the problem with them is that they are not supported and in the next upgrade we may have to go back and change all of our code.
There is an even easier way to hide a label or change its name than through script and its supported. I wish I could say the same for hiding a field but I have yet to find one.
So, what is this supported way? Well, its something so simple I'm sure everyone who's customized CRM has seen it but, like me, they don't pay any attention to it any more and forget that its there.
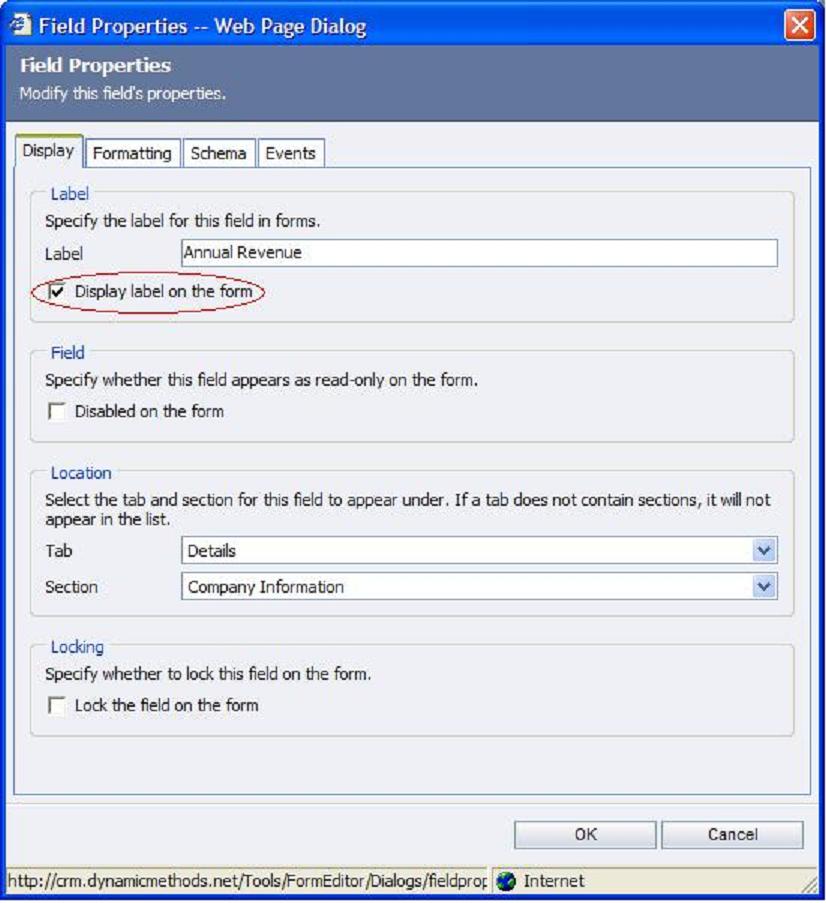
If you go to the Customization portion within Settings, open up the Form and double click on the field whose label you want to change or hide. The first text box is the name of the label. Just type in there to change what gets displayed on the form as the label of that particular field. Please note that this will NOT change the field's name in Advance Find, you would need to go to the Attributes section and change the Display Name of the attribute for that.
Now, the thing that I figure most people overlook (like I did) is the checkbox labeled "Display label on the form." If you uncheck that checkbox the label on the form will disappear and the textbox on the form will fill in the space of the label.

The only downside to using this approach is that it is a static setting. No dynamic renaming or hiding of the field. But this does the same thing as the scripts, only its supported and actually easier than going out and having to figure out the code to hack the CRM forms.
Fronk
crmForm.all.
The "_c" is the key to allowing you to then go on and use .innerText to change the Label value, or .style.visible for hiding the label.
These scripts work well but the problem with them is that they are not supported and in the next upgrade we may have to go back and change all of our code.
There is an even easier way to hide a label or change its name than through script and its supported. I wish I could say the same for hiding a field but I have yet to find one.
So, what is this supported way? Well, its something so simple I'm sure everyone who's customized CRM has seen it but, like me, they don't pay any attention to it any more and forget that its there.
If you go to the Customization portion within Settings, open up the Form and double click on the field whose label you want to change or hide. The first text box is the name of the label. Just type in there to change what gets displayed on the form as the label of that particular field. Please note that this will NOT change the field's name in Advance Find, you would need to go to the Attributes section and change the Display Name of the attribute for that.
Now, the thing that I figure most people overlook (like I did) is the checkbox labeled "Display label on the form." If you uncheck that checkbox the label on the form will disappear and the textbox on the form will fill in the space of the label.
The only downside to using this approach is that it is a static setting. No dynamic renaming or hiding of the field. But this does the same thing as the scripts, only its supported and actually easier than going out and having to figure out the code to hack the CRM forms.
Fronk
Wednesday, April 05, 2006
Simplifying use of client script usage on a form
For those of you who read through the entire SDK this may not be news to you but in my latest perusal of the SDK I found a really cool function that I hadn't seen before.
It is the "FireOnChange()". Basically its used to fire the onChange of another field. Why would you ever use this? Well, if anyone asks you to have autocalculating fields you have to do the calculations for each field separately, or code for every case and then copy and paste it into every field on the form that is related to the calculation. Not too bad. But if you then realize that you programmed something incorrectly, or something needs to be changed, you have to go back and make the change to every field with the code in it.
Using the "FireOnChange()" command helps you manage your code SOOOO much better. Basically, you write your code in one field and have it handle every case for all of the other fields. Then you just have all the other fields reference the field with the code. When you update or change the code you only have to do it once because all of the other fields are looking to one place for your code.
Usage:
crmForm.all.fieldname.FireOnChange();
That's it! Really simple but very helpful.
David Fronk
Dynamic Methods Inc.
Monday, April 03, 2006
Quick way to turn on Server side tracing
I forgot to post this with the Client side tracing, better late than never I guess.
Again, make sure there is a folder created on your C drive called "tracing" and then just copy and paste the text into a text file then change the name from .txt to .reg, double click and you're set!
StartServerTrace
Windows Registry Editor Version 5.00
[HKEY_LOCAL_MACHINE\Software\Microsoft\MSCRM]"
TraceEnabled"=dword:00000001
"TraceDirectory"="c:\\Tracing"
"TraceCategories"="*:Verbose"
"TraceCallStack"=dword:00000001
"TraceRefresh"=dword:00000001
"TraceSchedule"="Hourly"
"OleDBTimeOut"=dword:00008000
StopServerTrace
Windows Registry Editor Version 5.00
[HKEY_LOCAL_MACHINE\Software\Microsoft\MSCRM]
"TraceEnabled"=dword:00000000
"TraceDirectory"="c:\\Tracing"
"TraceCategories"="*:Verbose"
"TraceCallStack"=dword:00000001
"TraceRefresh"=dword:00000002
"TraceSchedule"="Hourly"
"OleDBTimeOut"=dword:00008000
Enjoy!
David Fronk
Dynamic Methods Inc.
Thursday, March 30, 2006
The Power of editing the Quick Find and Lookup Views
A number of times I have had users ask me about searching for companies by a contact name, or a contact by company name. These are typically people coming out of some contact manager that is set up on a flat file system. One day I decided to stop fighting against this paradiagm and give them a way to do it. Sure, you can teach them to go to Advance Find everytime but to sales people that' s a lot of clicks for a simple search.
On every object within the Forms/Views portion Customization is a View called "Quick Find View." On the right side there is an option to "Add Find Columns." This basically gives you the ability to open up any field within the table to be searched against. So, for instance, a contact typically searches against Full Name, First Name, and Last Name. But now we can add the "Find Column" of "Parent Company" and now from the main contact window I can type in "Microsoft" and see all of the contacts that have "Microsoft" as their Parent Company.
Sure you can do this by going to all of the Microsoft Companies and click on Contacts on the left side but that's a search, a double-click to open, and then anonther click to the contacts section. And if there are multiple Microsoft divisions in the database then that means I have to open each one up and look through them. This keeps things much simpler and easier.
Also, note that the Lookup View is set up the same way as the Quick Find View. And the advantage to setting up the Lookup View allows you to do these kinds of searches from the Form Assistant.
So, that's kind of a cool advantage to setting this up, but here's one of my favorite reasons for using this. I have a customer who installs systems at their client sites and they need to keep track of what they have installed there. They have a custom object they use for this. It is related to both Accounts and Cases. When customer support opens a case from the Account all of the Account information comes across. There is a lookup on the Case that goes back to the System object. Within the Form Assistant all of the Systems get pulled back and customer support just wants to see the Systems of the Account being worked on. So, by adding the Parent Account field on the System object to the Lookup View searchable fields, customer support can now type (or copy and paste) the name of the Account into the Form Assistant and pull back all of the Systems installed at the Account.
Something very simple but powerful when used the right way.
Happy Coding!
David Fronk
Dynamic Methods Inc.
Wednesday, March 29, 2006
Setting up Callouts
As I go and set up callouts I find that there are a lot of steps to remember on the set up and I always miss at least one and then I have to troubleshoot for the next 15 to 30 minutes something that should be rather simple. So, for you callout experts this may be simple and second nature to you. But for those of you who found callouts a little daunting at first I'm hoping to make them not so scary and daunting.
I used to always try and push as much custom stuff into workflow work arounds or something else because I could never get my callouts to fire correctly. But now that I have done it enough times and have the set up together I must say that I am sold on callouts and will be ready to do them whenever needed. And since they are so powerful I find that sometimes its better and easier to skip workflow and just use callouts.
Most of the items on this list don't have to be done in this order but this is the order that makes the most sense to me. So, here's the set up:
1. Make a Windows Library project in Visual Studio
a. Choose whatever language you prefer (C# or VB)
2. Change the name of the Class and Namespace if desired.
3. Create a reference to the Microsoft.Crm.Platform.Callout.Base.dll
a. In the code you also need to add this line of code:
using Microsoft.Crm.Callout;
4. Create a web reference to the CrmService and call it CrmSdk
a. The URL to the CrmService is (just with and http at the front):
([crmserver]/mscrmservices/2006/crmservice.asmx)
5. Decide what kind of callout you want. You can either have Pre or Post (unless otherwise specified) to the following events listed below:
a. Create
b. Update
c. Delete
d. Assign
e. Set State
f. MergePersonally
g. PreSend
h. PostDeliver
I always refer the "calloutsample2" code from the CRM SDK sample code because it has all of the constructors for each of the available events and I can just copy and paste the correct constructor into my code. This way I avoid unnecessary errors later on. Also, its a good template to compare your basic code set up against.
6. Also be sure to include the interface call to the CrmCalloutBase or else none of your callouts will work. You need to do this on the same line as your class constructor. From the calloutsample2 code it looks something like this:
class CalloutComponent: CrmCalloutBase
Or more generally:class
[name of your class]:CrmCalloutBase
7. I also always add these methods of code for troubleshooting purposes (also from calloutsample2):
private string GetPath(){
string retval = null;
RegistryKey key = Registry.LocalMachine.OpenSubKey("Software\\Microsoft\\MSCRM", true);
retval = (string)key.GetValue("CRM_Server_InstallDir");
retval = Path.Combine(retval, @"server\bin\assembly\");
key.Close(); return retval;
}
private void WriteToFile(string message){
using (StreamWriter sw = File.CreateText( Path.Combine(GetPath(), "callout_test_output.txt")))
{ sw.WriteLine(message);
}
}
This code will give you the ability to output your code into a text file. This is the only way I've seen how to troubleshoot your callout code properly. You can look in the event log for errors but generally they are so generic that they aren't very useful. However, there are some useful errors so don't NOT use the event logs. Any source of error reporting with callouts is welcome in my book.
8. Code wise you're just about there. Now all you have to do with this part is code what want the callout to do. However, even once the callout is coded it won't work unless to continue on with the rest of the perparations below.
9. Callout.config.xml
a. This is the file that links the code with the application. If this file is not set up correctly then your callout (no matter how beautifully coded) will never fire.
b. Here's what it looks like in its basic element:
<callout.config version="3.0" xmlns=" http://schemas.microsoft.com/crm/2006/callout/">
<callout entity="[entity name]" event="[event name]">
<subscription assembly="[name of dll].dll" class="[namespace].[classname]"/>
</callout>
</callout.config>
This file needs to be saved on the server at this location:
"C:\Program Files\Microsoft CRM\Server\bin\assembly"
10. Once that's done you will need to copy over your dll to the same location:
"C:\Program Files\Microsoft CRM\Server\bin\assembly"
11. Now run your callout and troubleshoot as necessary. That's the basic set up.
12. A few words about Troubleshooting
a. Whenever you change your code you must recompile your code and then copy your dll to the server.
b. But the dll will be in use and not be able to be overwritten until it is not in use. So, here's the best practice method of getting your most up to date code onto the server. Note, this only needs to be done when you are overwriting your dll that is already on the server.
i. Do an IISRESET on the CRM server.
ii. Stop the CRM Workflow service
iii. Copy the dll onto the server
iv. Do another IISRESET - this is necessary for the server to recognize the new dll
v. Restart the CRM Workflow service
c. Now your code is updated and you are ready to test your code again. Just go to the entity and fire the event you set up your code to do.
That's callouts in a nutshell. A lot to remember at first but once you get it all together and get it working they are VERY powerful.
Happy coding!
David Fronk
Dynamic Methods Inc.
Thursday, March 23, 2006
Quick way to turn on Client side tracing
Whenever I have a client issue I hate having to turn on tracing. The first time is the worst because of having to create every key. I have to refer to a list so that I remember which type they all have to be, setting, etc.
I then found out about creating a .reg file that would create and turn on/off the client tracing for me. It's really easy, all you have to do is copy and paste the below code into a text file and change the extension to .reg instead of .txt. Also, create a folder "tracing" under the C drive (C:\tracing) as one of the keys is set to place the trace files under this location.
Here's the code for the reg key to start the client trace (starttraceclient.reg):
Windows Registry Editor Version 5.00
[HKEY_CURRENT_USER\Software\Microsoft\MSCRMClient]
"TraceEnabled"=dword:00000001
"TraceDirectory"="c:\\Tracing"
"TraceCategories"="*:Verbose"
"TraceCallStack"=dword:00000001
"TraceRefresh"=dword:00000001
"TraceSchedule"="Hourly"
"OleDBTimeOut"=dword:00008000
Here's the code for the reg key to stop the client trace (stoptraceclient.reg):
Windows Registry Editor Version 5.00
[HKEY_CURRENT_USER\Software\Microsoft\MSCRMClient]
"TraceEnabled"=dword:00000000
"TraceDirectory"="c:\\Tracing"
"TraceCategories"="*:Verbose"
"TraceCallStack"=dword:00000001
"TraceRefresh"=dword:00000002
"TraceSchedule"="Hourly"
"OleDBTimeOut"=dword:00008000
It sure makes this a lot easier for troubleshooting because you don't have to open the registry every time, just double click your file and you're set! Enjoy!
David
Monday, March 20, 2006
DataGrids in a custom page
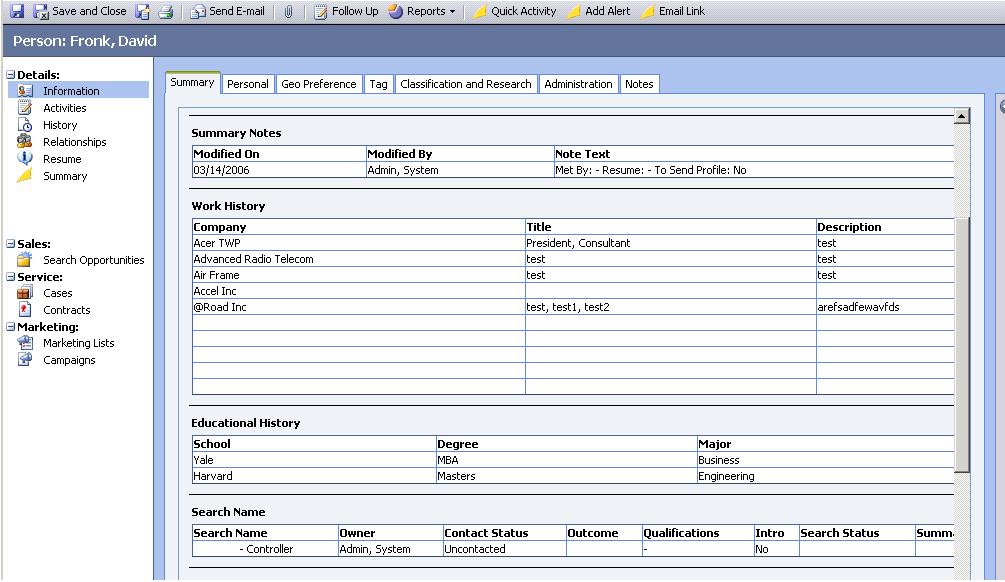
I've been working on a cool customization for one of our clients where the first screen you see is a "quick" summary of information from a given contact.
Some of the cool points about this customization are:
1. We found that by placing the custom tab first it loaded first instead of the General tab. Not something ground-breaking but one of those neat things to tuck away in your "gee-whiz" file for later.
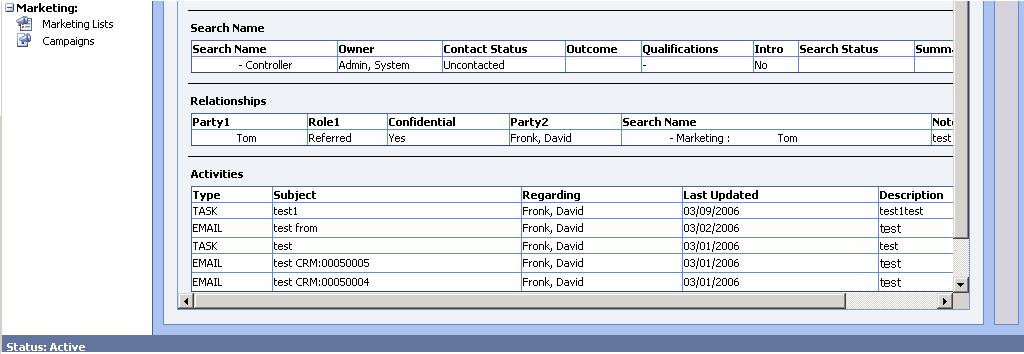
2. This page pulls information from multiple related objects, Activities, Notes, Opportunities, etc, and displays given information on the page.
3. Related object information is displayed in datagrids. The coolest thing about this is that typically datagrids require a connector to SQL and you have to do a direct SQL pull to get your info. These grids, however, do not use a SQL connector and load CRM data through the CRM API. This means that I'm not breaking any Microsoft rules by doing a direct SQL pull and that you can keep your security views of the user viewing the contact.
4. The first time it loads on a client machine takes a few seconds. But after that the page loads just as fast as the rest of the CRM data.
Here are some screenshots of what it looks like:
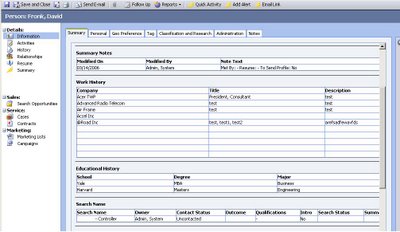
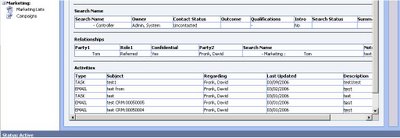
It's all bogus data, but you get the idea. Just one of the cool customizations you can do with IFRAMES and custom ASPX pages. Happy coding!
David Fronk
Dynamic Methods Inc.
Some of the cool points about this customization are:
1. We found that by placing the custom tab first it loaded first instead of the General tab. Not something ground-breaking but one of those neat things to tuck away in your "gee-whiz" file for later.
2. This page pulls information from multiple related objects, Activities, Notes, Opportunities, etc, and displays given information on the page.
3. Related object information is displayed in datagrids. The coolest thing about this is that typically datagrids require a connector to SQL and you have to do a direct SQL pull to get your info. These grids, however, do not use a SQL connector and load CRM data through the CRM API. This means that I'm not breaking any Microsoft rules by doing a direct SQL pull and that you can keep your security views of the user viewing the contact.
4. The first time it loads on a client machine takes a few seconds. But after that the page loads just as fast as the rest of the CRM data.
Here are some screenshots of what it looks like:
It's all bogus data, but you get the idea. Just one of the cool customizations you can do with IFRAMES and custom ASPX pages. Happy coding!
David Fronk
Dynamic Methods Inc.
DM enters into the MSCRM blog-world
My name is David Fronk and I work for Dynamic Methods in Orange County California. We are a Dynamics CRM and GP reseller and implementer. This blog will focus mainly on Dynamics CRM from Microsoft and more specifically about customizations that we've done for CRM and random issues/problems that we've run into and how they have been resolved.
There are a lot of communities for CRM out there and a lot of cool things are being accomplished with CRM customizations. I hope to add some of our development and customization knowledge to the CRM community to help all of those Microsoft CRM partners out there be able to say: "We can do that for you with Microsoft CRM."
David Fronk
Dynamic Methods Inc.
Subscribe to:
Comments (Atom)